Several folks said that the tutorial does not print well directly from the blog, so I made a PDF file of it. Thanks for the feedback and suggestions!
You will need embroidery floss, scissors, and some way to secure the knotted end while you work with the loops. I will admit that I am still not very good at estimating how long the strings need to be. I think the length you cut each thread should be about 3 times the desired finished length of the braid, but some of that will be affected by tension.
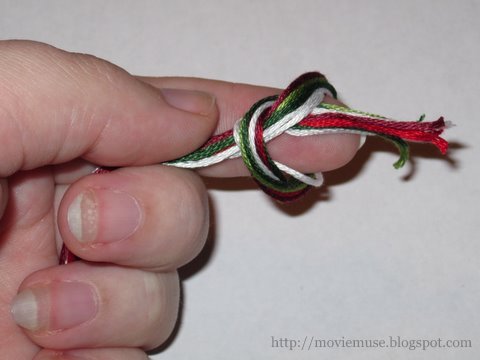
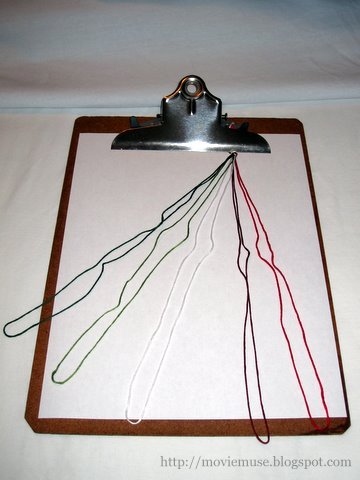
Start with 3 times the final length and experiment. Better too long than too short; you can always just stop weaving when it gets long enough. Cut 5 segments of embroidery floss (don't pull the individual strands apart; use them all together, just as they come off the skein). Gather all 10 cut ends together to make 5 loops of floss. Even length loops is the goal. Don't worry if all of your ends don't line up due to slight differences in the length of the strings (you can always trim them up later). Carefully knot the cut ends together in a single knot about an inch (3 cm) from the end, keeping the loops as separate and even in length as possible.

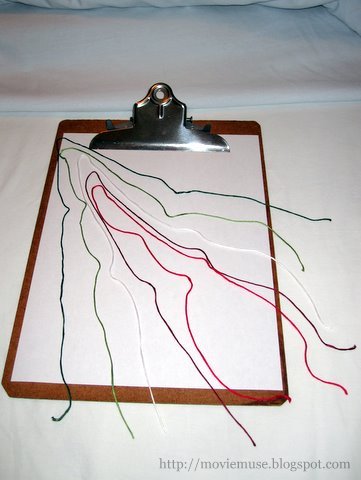
Secure the knotted end; use a friend, a safety pin (be careful, the pin might wear a hole in whatever it is attached to), a clipboard, etc. It needs to be secure enough to withstand all of the tugging on it you are about to do. Some people use tape, but that does not work well for me personally. I tend to pull hard enough to have it come unstuck with the amount of tension I use, but it might work for you.
Try to untangle the loops as much as you can before putting them on your fingers. To make sure we are all on the same page, this is how I am naming the fingers. In the picture below (left hand, palm facing you), naming left to right, I am referring to them as: thumb, index, middle, ring, pinky. For a 5-loop box braid, you will not use your thumbs or your pinky fingers for weaving. (I will briefly discuss a 7-loop box braid at the end.)

With the knotted end secured to a point away from you, take three loops and put one on each of the following fingers: left index, left middle, and left ring. The loops should rest in the crook of your fingertip, right at the bend of the knuckle joint just below your fingernail.
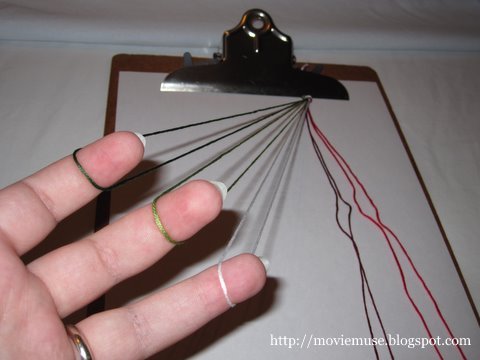
Take the remaining two loops and put one on each of the following fingers: right index and right middle (your right ring finger should be empty). Pull the loops towards you, away from the knotted end, until there is very little slack in the loops (this will make it easier to see which strands to work with). Turn your hands so that your palms are facing each other, thumbs towards the ceiling. With your hands in this position, each loop has a "top" and "bottom" strand.
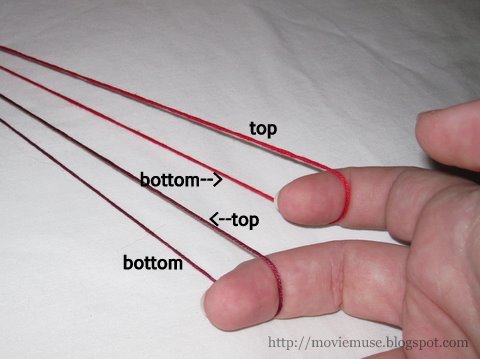
Take your right ring finger (it should be empty) and put it between the top and bottom strands of the loop on your left ring finger, then put it between the top and bottom strands of the loop on your left middle finger. Now, use your right ring finger to grab the top strand of the loop on your left index finger and pull it through. Do NOT put your right ring finger between the strands of the index finger loop before grabbing and pulling it trough; be sure you grab the top strand from above (otherwise the braid will split). You should now have three loops on your right hand and two loops on your left hand.
Pull your hands apart (don't drop the loops!), keeping the loops taut, until the loops form a nearly straight line. This will "snug up" the "stitch" you just made. Use the same amount of force/tension each time you do this so that the braid will be even. Now, take the two remaining loops on your left hand and "walk" them up your hand: transfer the loop on your left middle finger to your left index finger, then transfer the loop on your left ring finger to your now empty left middle finger. Your left ring finger should now be empty.
Repeat the previous steps, this time using your left ring finger to weave between the strands of the loops on your right ring finger and right middle finger. Grab the top strand of the loop on your right index finger from above and pull it through. You should now be back to three loops on your left hand and two on your right. Pull your hands apart to cinch up the stitch and walk the loops up on your right hand (middle finger loop moves to index finger, then ring finger loop moves to middle finger) so that your right ring finger is empty.
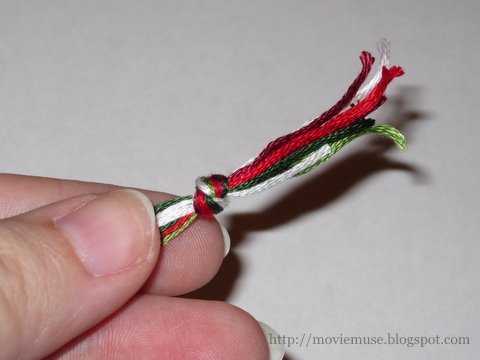
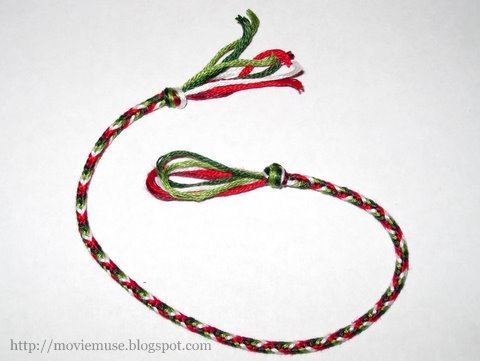
Repeat until your braid is the desired length, weaving about 1/2 inch (1 cm) more than you think you need to allow for the knot. Grab the braid right at the end of the woven section. Hold it firmly so it does not unravel as you slide the loops carefully off your fingers. Knot the loop ends together as close to the braid as you can. Trim ends to desired length, but not too close to the knot or it might pull itself out. (I did not trim my ends, sorry.) Ta-da!
This braid started with floss strands about 24 inches (61 cm) long. I ended up with a total length of about 11 inches (28 cm), with about 9 inches (23 cm) of usable braid. Elapsed time from cutting the floss to knotting the loop ends was about 18 minutes. Though I learned the technique for making friendship bracelets, I now use it primarily for hanger loops on stitched ornaments and scissor fob cording.
I tried filming myself doing this with my digital camera, and I wasn't very good at being my own cameraman! If you need to *see* it done (which really does help), this is the best video from a technique perspective I have found: How to Make a "Box" Friendship Bracelet by ImaginaryOranges. She's not the most dynamic speaker, and she takes a while to get going (about a minute in). I also don't find her verbal explanations the most helpful, which is why I wrote my own. But for demonstrating the technique, this is the best video I've found so far.
Erin's Tips:
* The first little bit of the braid up by the knot won't be perfect. Keeping the loops/ends in order as much as you can while knotting will help, but don't worry about it too much.
* It is best to start and complete the entire braid in one sitting; starting and stopping is difficult and can result in a flubbed spot in the final braid. If you must start and stop, be sure you put the loops back on the same fingers they came off of. If you don't, there will be both a flub and a change in the order of the colors.
* The more even the tension as you cinch up the stitches, the more uniform the resulting braid. The tighter it is, the boxier (less rounded) it will appear. Experiment with tension to produce a braid that *you* like; there is no right or wrong tension, just personal preference.
* It is critically important to grab the top strand of the loop you are pulling from your index finger from above the strands, not from between them. If you grab the strand from underneath, or if you grab the bottom strand instead of the top strand, you will end up with a split braid instead of a single square box braid.
Regarding Colors:
You can make each of the 5 strands a different color, you can make them all the same, or some combination. You just need 5 strands total. If you want the colors to appear in a certain order, put them on your fingers from the index finger down, doing one hand first, then the other. For example, to produce a braid with the colors in rainbow order (red, orange, yellow, green, blue), place the loops as follows:
red = left index
orange = left middle
yellow = left ring
green = right index
blue = right middle
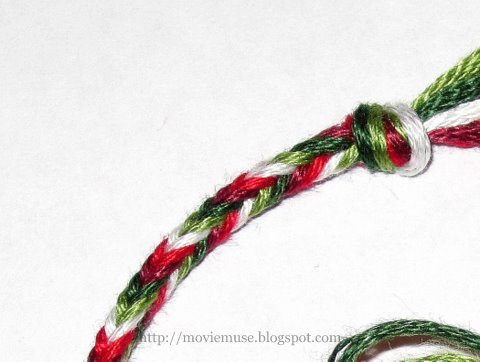
To produce the braid shown, I used the colors as follows:
dark green = left index
light green = left middle
white = left ring
light red = right index
dark red = right middle

You can do this same braiding technique with 7 strands as well. Put 4 loops on one hand and 3 on the other, then use your pinky fingers to weave instead of your ring fingers. For 7 strands in ROYGBIV order, place the loops as follows:
red = left index
orange = left middle
yellow = left ring
green = left pinky
blue = right index
indigo = right middle
violet = right ring
If you try it, I'd love to hear from you! I haven't had anyone trial these instructions yet; I hope they work for you. Let me know if you have any questions, or if you think some parts of this tutorial need additional explanation or clarification. Enjoy!
Currently feeling:
 stringy
Oh Erin! Thank you, thank you, thank you so much!!!!! I can't wait to get started on this. I still have the original one that you helped me with those many years ago. LOL And I do greatly appreciate you sharing your secret.
ReplyDeleteTerry
This is fascinating! I have not seen a braid like that. I may have to try it sometime soon--thanks for sharing!
ReplyDeleteThat looks like it would make great cord for around ornies and such. I might have to try it. :)
ReplyDeleteAlso brings back memories from the 80s and my own knotted bracelets I made with a different technique. :)
Dear heaven, I'm cross eyed just thinking about it!!!I swear I don't have enough fingers for this.....I'll stick to iris folding!
ReplyDelete